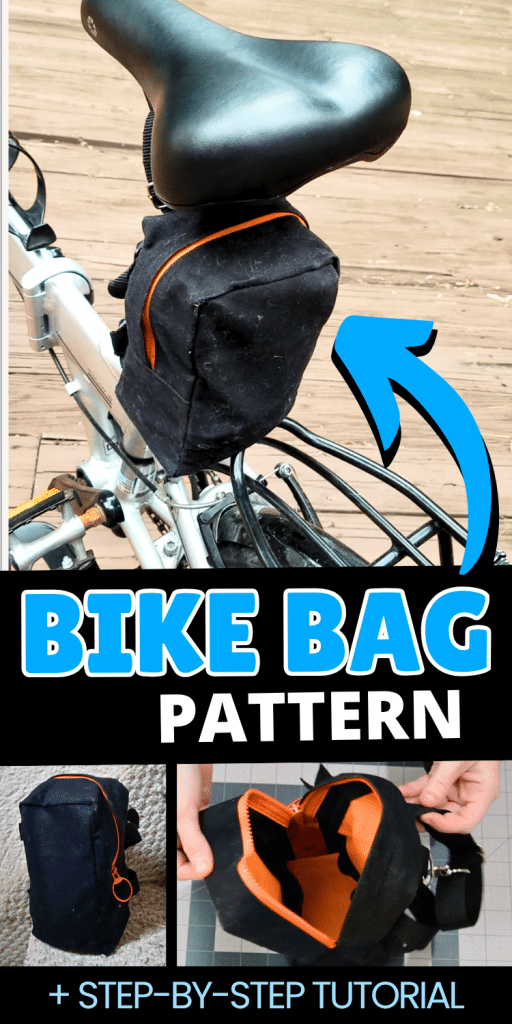
Tutorial: Simple Under-Seat Bike Bag
This is a tutorial to walk you through how to make a bag that fits under the seat of your bike. This is great for holding those bike tools that are handy in a pinch. The bike bag has pockets on the inside and I’ll show you how to make a bound seam finish for sturdy seams that will stay strong even through heavy use. This tutorial works best with heavy fabrics, like canvas. Simply access the free printable pattern below and follow along with the step-by-step instructions.
I wanted a bag where I could put a spare tube and hand pump to make it easier to bring them along with me while I bike. As much as possible, I’ve been trying to avoid buying anything new, so I thought this was a great opportunity to try making my own little bike bag. While I was at it, I decided to try making a pattern so you can make your own bike bag too!

Supplies Needed:
all of my patterns include 1/2″ seam allowance

Step 1

Fold the Zipper overlap along the fold line
Fold the fabric to the wrong side along the fold line. (I’m sorry the image is so dark)
Step 2

Sew the zipper face down to the overlap piece
Line the zipper up with the raw edge of the fabric. It should be face down on the wrong side of the overlap piece. Then sew it through all layers along the upper edge. It’s okay if the zipper’s tail is a little too long. (note: the stitching will be visible on the right side of the fabric)


Step 3

Place the other zipper piece face down on the zipper
line up the edge with the other side of the zipper and sew. You may want to add two line of stitches for a little extra reinforcement.

Step 4

press the bottom layer down away from the zipper
You can also topstitch the edge of the fabric for a clean look.
Step 5

sew the zipper piece to the bag bottom
With right sides together, line up the short sides of the bottom piece with the zipper piece and sew them together to form a loop that will be the side of the bag (be careful when sewing over the zipper teeth). You can add a second layer of stitches to reinforce the seam if you want to.
At this point, you can also choose trim the zipper tail if it’s too long, but it’s also okay to leave it as is.


Step 6

hem the upper edge of the pockets
Sew on narrow hem on the upper edge of both pocket pieces

Step 7

optional: sew the pocket to the lining along the center
Sew the center of the pocket to the center of the lining (as seen above). You can skip this step if you want, but I wanted this pocket divided into two sections.

Step 8

baste the pockets to the edge of the lining
Line up the pockets with the bottom and edge of the lining and baste them in place. The pockets’ upper edge will be a little bigger than the the lining to allow space in the pockets to add supplies when your bag is finished.

Step 9

baste the lining to the front and back
Line up your lining pieces with the front and back pieces and baste them together with wrong sides together.

Step 10


baste belting and sliders to the back
Prep the back with the belting and slider pieces to that you will be able to tether it to your bike easily.
- Insert small pieces of belting through two sliders and baste them to the right side of the bag
- Add two 10″ lengths of belting to the left side of the bag (you may want to trim these later when seeing how it fits on your bike
- on the top, add a D-ring and another 10″ length of belting.
Once everything is basted in place, loosely tie the belting together in the center to keep it out of the way in the next steps.


Step 11

Sew the front and back to the side piece
Line up the front and back with the side piece and sew everything together, pivoting at the corners.


Step 12

bind the seams with twill tape
To finish the seams and reinforce them, fold twill tape around them. This will enclose the seam so it won’t fray, and help make sure the bag can stand up to heavier use.


Step 13

turn the bag to the right side
(note: Sorry for all the pet fur, the fabric that I used seemed to attract it like crazy)

Step 14

Hem the base insert
Hem one of the long edges of the base insert piece.

Step 15

Fold the base in half and sew

Step 16

Turn the base to the right side and insert a piece of cardboard
Clip the corners and turn the base to the right side. Cut a piece of cardboard that is about 3″x4″ and insert it.

Step 17

place the base at the bottom of the bike bag
This adds support to the base.
Step 19

Add the slider and hook to the top strap
You want to first thread the belting through the slider, then around the clasp piece. Then you want to come back to the slider piece and loop the belting around the center rung. Fold it over and stitch. Then you can clip it to the D-ring.


Finished!