Tutorial: How to Make a Clutch Purse WITHOUT a Zipper
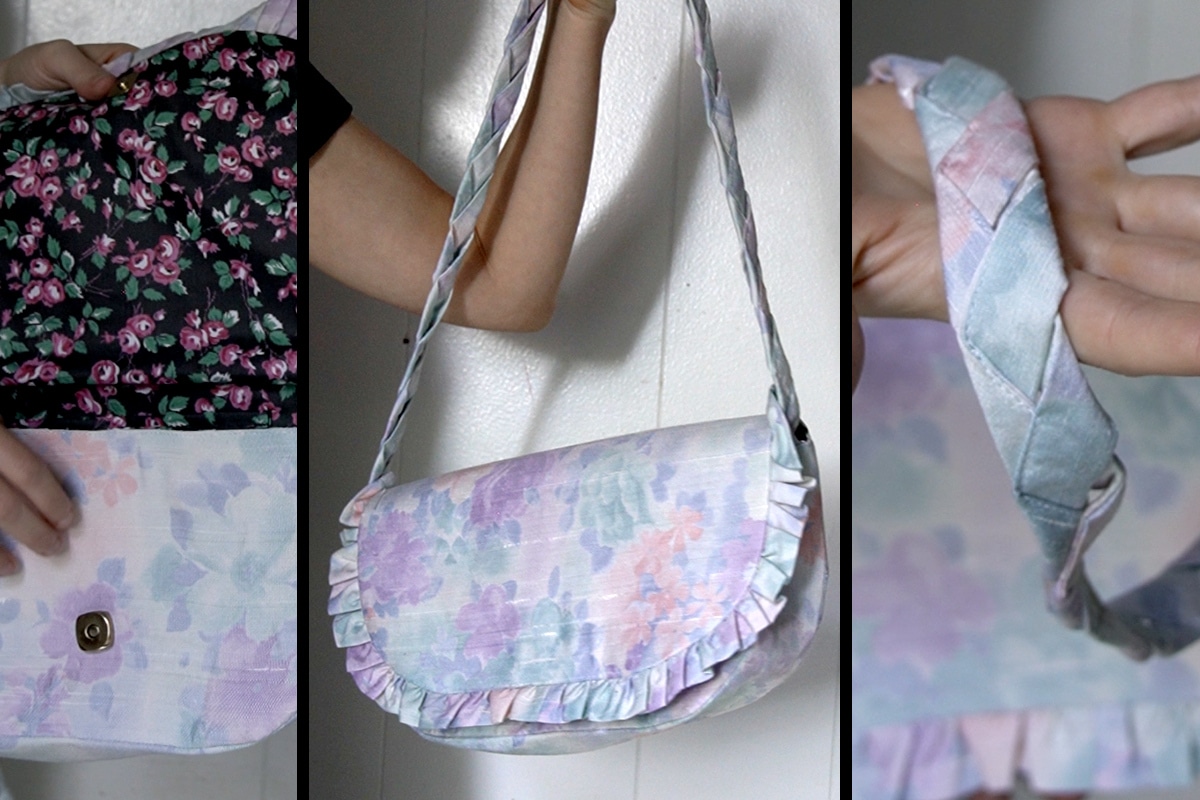
In this tutorial, I’ll show you step-by-step how to make a large clutch purse with an inner pocket and magnet closure. I’ve also provided the pattern that I made for this bag (for free) so you can follow along with the steps. I also decided to make a decorative handle to make the clutch look a little more interesting.
Since I have the tendency to get an extra 1/2 yard of fabric “just in case” when I purchase fabric for my sewing projects, I always have a bunch of extra half yards laying around, so I decided to make a cute bag and lining with these one.
This page contains affiliate links. As an Amazon Associate, I earn a small commission from qualifying purchases. That being said, I encourage you to use your local sewing shop whenever possible, or to look for supplies second hand.
Supplies Needed:
Pattern includes:
(all of my patterns include 1/2″ seam allowance)

Step 1

Apply interfacing
Apply interfacing to the front, back, and gusset pieces. Since I’m using a heavy interfacing, I find it useful to trim the seam allowance to reduce bulk when sewing. However, this is not entirely necessary.
For the straps, I used a lighter weight interfacing, since they will be folded in half.

Step 2

Apply the magnet snap to the front fabric and flap lining
Use the dot on the pattern to help with placement. The way you apply the magnet can vary, so check the instructions that come with your kit. I recommend applying a bit of interfacing to the back of the lining layer to reinforce the magnet (the front of the bag should already have interfacing applied)


Step 3

sew the gusset to the front
With right sides together sew the side/base gusset piece to the front of the bag.

Step 4

sew the back and flap to the gusset
Then add the back and flap and sew with right sides together. The gusset will only extend halfway up the back piece, since the rest will fold over. When finished, turn right side out and be sure to press the seams.

Step 5

sew the straps in half and turn them to right side out
Press the two strap pieces so that they lay flat.

Step 6

sew the two strap pieces together at a diagonal at one end
Step 7


Fold the two pieces around each other
Fold according to the diagram above. Fold the first piece over, and then fold it so that it’s parallel with the other strap piece. Fold the second piece over, and then fold it parallel with the first. Continue with this pattern for the entire length of the straps.

Step 8

sew the strap twist in place
Pin the strap and sew a zigzag edgestitch along the entire strap to sew it in place.

Step 9

baste the straps to the side of the bag

Step 10

hem the ends of the ruffle and fold in half
Fold the ruffle with WRONG sides together.

Step 11

Using a wide basting stitch, gather the ruffle
Change the stitch length on your machine to 4 or 5 and then stitch down the length of the ruffle. Pull one side of the stitching to gather the ruffle.
Step 12

Sew the ruffle to the sides of the flap
Pin the ruffle to the edge of the bag and even out the gathers. Then stitch it in place.
Step 13

Hem and fold over the edges of the inner pocket
Step 14

sew the pocket to the back lining
The opening should be facing the center of the lining on the opposite end as the magnet.

Step 15

assemble the lining according to steps 3 and 4, leaving a gap in the base

Step 16

place bag inside lining and sew the edge all the way around

Step 17

flip bag through gap in lining and sew up the gap

Step 18

edgestitch the top of the bag
Edgestitch the very top to keep the lining down on the inside for a more finished look.
Finished!